class: center, middle, inverse, title-slide .title[ # Introduction to WebMaps ] .subtitle[ ## Lesson 2: Building simple WebMaps and uploading them to a server ] .author[ ### Dr. <strong>Cyrille Médard de Chardon</strong> ] .institute[ ### <br>University of Luxembourg &<br>Luxembourg Institute of Socio-Economic Research (LISER) ] .date[ ### <br>May 4, 2023 ] --- class: # Everything looks like a nail .pl[ Before making a WebMap, ask yourself: - Is the concept/idea valid? Does it makes sense cartographically to compared to a static map? - What is the best medium to communicate your data? - Do not think all maps are best shared using WebMaps ] .pr[  .source[[McCullen, 2018](https://medium.com/thethursdaythought/when-all-you-have-is-a-hammer-everything-looks-like-a-nail-the-einstellung-effect-on-67ee8449f740)] ] --- # Valid WebMap applications .pl[ WebMaps are great for exploring or communicating data that necessitate changing scale, area and comparing data to general spatial features (base maps) to comprehend. To take an example from last lesson, the airline flights example is quite a good example of this. You can focus on an individual airport, specific regions (e.g., Greenland vs Africa) or the world. If I wanted to improve that map I could make it that clicking on an airport highlights those flights in particular. ] .pr[ .w90[] .source[[esri](https://www.arcgis.com/apps/View/index.html?appid=6f53ca5e2b8c480888e96e5f71929c08)] ] --- # WebMap pyramid of requirements .tl[ The skills required for WebMap development - Need to be able to use a computer. - Understand absolute/relative paths of file structure. - Understand how WebMaps function and where data is stored. - Have some cartographic basics. - Understand some **JS, CSS and HTML** basics. - Be able to generate and export GIS data. - Understand some basic data types. ] ??? Last week had some technical background taking time last week, but it’s necessary, and while we will be making WebMaps this week, we’ll continue to use the knowledge from last week and develop new skills. --- # Agenda for Lesson 2 .pl[ 1. Making and understanding the index file 2. Uploading your web page from last week to the server 3. Creating your first WebMap (Leaflet) 4. Creating a WebMap of flight paths using QGIS 5. Uploading more WebMaps to your server ] .pr[  ] --- class: inverse, center, middle, activity # Demonstration ## Two HTML files .pl[ I will create a folder on my website named `test`. It has two html files inside, named: - index.html - info.html When I use the browser to navigate to the **folder named `test`**, what do you expect to happen? What actually happens, and why? ] ??? SSH onto the server, into my user account's public_html and: - create a folder named `test` - create a file named `index.html` with the content - I'm index.html - create a file named `info.html` with the content - I'm info.html - Add links between the two files --- # Creating an HTML start page .pl[ Download the [zip file](rsrcs/l2/lesson2.zip) for this lesson. - **Unzip it** (Windows will happily let you look inside without unzipping - that's bad) - Personalize/edit your welcome/main page (index.html) in your HTML editor of choice. - Right click on index.html and “open with…” or open/find index.html from your editor. - Make some minor modifications. For example adding your name to the title or heading. - Add a link to your 'about me' page from last week's homework. ] .pr[ - Test it in a browser (**double click** on index.html - it should open in your default browser). - The link to your 'about me' page should work. *Being organized and clean in terms of files and folders will be very important* **For the remainder of the course you will be contributing to building up your website (i.e., this folder's contents).** ] --- class: inverse, center, middle, activity # Activity 1 ## Making your landing page .pl[ Note the importance of the index.html file: - Browsers look for it ] --- class: inverse, center, middle, activity # Uploading to a server .pl[ **[Our server for this course: http://164.92.179.32](http://http://164.92.179.32/)** I will individually give you your passwords now ] ??? The purpose of WebMaps is to provide spatial data interaction/exploration **online**. Typically WebMaps are placed within a website providing the context - similar to what you have done in esri’s Story Maps. Hopefully at this stage you have a working mini-website working on your **local machine**. We need to learn how to put our content on-line. Placing content on-line requires having a computer permanently on and connected to the internet that is running software that can respond to requests for information, what we call a **server**. I have spun up a temporary server using **DigitalOcean**. It costs about 7 EUR per month. Cheaper options exist (e.g., 20 EUR/year). --- # Working on a server .pl[ A note on your using this server. **Always keep a good copy of your data on your local machine**. 1. Work on things on your local machine 2. Get it working (as much as possible) 3. Upload to the server. - Don't upload very large files, such as videos to the server. - Don't use the server for any content not related to this course. This server will not be active beyond the final assignment submission deadline. ] .pr[ .w66[] ] --- # URLs vs Server file paths .pl[ We saw last week how paths and relative paths 'match'. While this relationship is maintained once you put data on the server, where your 'root' webpath and URL meet can be arbitrary. However, this is typically standardized. If want an html file to appear at your URL: `http://164.92.179.32/~cyrille` then you must place your `index.html` file at the location `/home/cyrille/public_html/index.html`. You may have to create the `public_html` directory and set permissions to `755`. ] .pr[ .w66[] ] --- # How to upload - Secure FTP .pl[ There are various methods and tools we can use to upload. A common introductory method to move files between your computer and the server is **FTP** (File transfer protocol). *Don't use this as it's insecure*. **We now use SFTP** (Secure FTP). We will use software called [FileZilla](https://filezilla-project.org/download.php?type=client), a good, free, and cross-platform **(S)FTP client**. We are using FileZilla Client (not FileZilla Server) ] .pr[  ] ??? We might talk about using FTP generally but we always mean SFTP. If you download the FileZilla, you want the Client, not the FileZilla Server! --- # FileZilla .pull-left[ The basics: - The toolbar allows you to connect/disconnect/configure. - The left button allows you to save configurations and quick connect. - Note the two viewing options on the toolbar's right. - Shows you differences. - Allows you to explore both your local machine and the server simultaneously. 1. The activity pane. 2. **Your computer**'s directory tree. 3. **Your computer**'s selected directory's contents. 4. **The server**'s directory tree. 5. **The server**'s selected directory's contents. ] .pr[  ] --- # FileZilla configuration .pl[ To connect to the server, configure FileZilla by opening the Site Manager: - Click the icon in the toolbar at the top left of FileZilla . It opens the Site Manager window (to the right). - On the bottom left click **New site** button and give it a name (e.g., WebMaps course) - On the right specify the: - Protocol: SFTP - Host: 164.92.179.32 - User: [your username] - Password: [your password] - Click **Connect** ] .pr[  ] --- class: inverse, center, middle, activity # Activity 2 .pl[ ## Upload your website to FileZilla now It should have a main **index.html** page, and an **aboutme.html** page. ] --- # Creating our first WebMap .pl[ We will create our first WebMap using the [Leaflet library](https://leafletjs.com/). The [Quick Start Guide](https://leafletjs.com/examples/quick-start/) assumes we have some knowledge of HTML. - Look in the [zip resources](rsrcs/l2/lesson2.zip) provided for today. - **Duplicate** the file named `template.html` in `resources_wk2/website/pages/` - Rename it `leaflet_example.html` (or something clear) in the same folder. - Open `leaflet_example.html` in your code editor of choice (e.g., Notepad++) ] .pr[ Follow the instructions on the [Quick Start Guide](https://leafletjs.com/examples/quick-start/) and integrate the resources (CSS, JS, HTML) into your file. - You must link **two files** and add some HTML, JS, and CSS as well. - As we covered last week, I strongly recommend you keep the CSS and JS in separate files from the HTML for simplicity for now. ] --- # A tale of two codes Look in the provided **resources/A_tale_of_two_codes** to see the two files below (here abridged to fit): .ts[.pull-left[ ```html <head> <title>Integrated Leaflet WebMap</title> <link rel="stylesheet" href="https://unpkg.com/leaflet@1.8.0/dist/leaflet.css"/> <script src="https://unpkg.com/leaflet@1.8.0/dist/leaflet.js"></script> <style> #map { height: 180px; } </style> </head> <body> <div id="map"></div> <script> var map = L.map('map').setView([51.505, -0.09], 13); L.tileLayer('https://api.mapbox.com/styles/v1/{id}/tiles/{z}/{x}/{y}?access_token={accessToken}', { attribution: 'Map data © <a href="https://www.openstreetmap.org/copyright">OpenStreetMap</a> contributors, Imagery © <a href="https://www.mapbox.com/">Mapbox</a>', maxZoom: 18, id: 'mapbox/streets-v11', tileSize: 512, zoomOffset: -1, accessToken: 'your.mapbox.access.token' }).addTo(map); </script> </body> ``` ]] .ts[.pull-right[ ```html <head> <title>Separated Leaflet WebMap</title> <link rel="stylesheet" href="https://unpkg.com/leaflet@1.8.0/dist/leaflet.css"/> <script src="https://unpkg.com/leaflet@1.8.0/dist/leaflet.js"></script> <link rel="stylesheet" href="separated.css"/> </head> <body> <div id="map"></div> <script src="separated.js"></script> </body> ``` ```css /* separated.css */ #map { height: 180px; } ``` <style type="text/css"> /* separated.css */ #map { height: 180px; } </style> ```js // separated.js var map = L.map('map').setView([51.505, -0.09], 13); L.tileLayer('https://api.mapbox.com/styles/v1/{id}/tiles/{z}/{x}/{y}?access_token={accessToken}', { attribution: 'Map data © <a href="https://www.openstreetmap.org/copyright">OpenStreetMap</a> contributors, Imagery © <a href="https://www.mapbox.com/">Mapbox</a>', maxZoom: 18, id: 'mapbox/streets-v11', tileSize: 512, zoomOffset: -1, accessToken: 'your.mapbox.access.token' }).addTo(map); ``` <script> // separated.js var map = L.map('map').setView([51.505, -0.09], 13); L.tileLayer('https://api.mapbox.com/styles/v1/{id}/tiles/{z}/{x}/{y}?access_token={accessToken}', { attribution: 'Map data © <a href="https://www.openstreetmap.org/copyright">OpenStreetMap</a> contributors, Imagery © <a href="https://www.mapbox.com/">Mapbox</a>', maxZoom: 18, id: 'mapbox/streets-v11', tileSize: 512, zoomOffset: -1, accessToken: 'your.mapbox.access.token' }).addTo(map); </script> ]] ??? On the left the three, HTML, CSS, and JS are integrated. On the right are the contents of separate files. The HTML, CSS, and JS. --- # Linking your files .pull-left[ In the `<head>`: - Webpage title - Link to Leaflet CSS - Link to Leaflet JS - Link to **your** CSS In the `<body>`: - a `<div id="something"></div>` that will contain your WebMap. - below the above `id`: - Link to, or provide, **your** JS Just like we linked HTML to CSS and JS **files**, we can now link to HTML **elements**, using CSS and JS. ] .pull-right[ You will follow the [directions](https://leafletjs.com/SlavaUkraini/examples/quick-start/) for the following sections: - [Preparing your page](https://leafletjs.com/SlavaUkraini/examples/quick-start/#preparing-your-page) - [Setting up the map](https://leafletjs.com/SlavaUkraini/examples/quick-start/#setting-up-the-map) - [Markers, circles, and polygons](https://leafletjs.com/SlavaUkraini/examples/quick-start/#markers-circles-and-polygons) - [Working with popups](https://leafletjs.com/SlavaUkraini/examples/quick-start/#working-with-popups) - Do not do the last section on Dealing with events ### Results? If after all that work... .w50[] *What's the problem? Use F12 - the developer console!* ] ??? I will do an overview of the activity steps first. Explain why this is doomed to failure. --- # Mapbox .pull-left[ As you've seen from the previous exercise, the tiles you are using belong to Mapbox, created from OSM data. As we will not be generating our own tiles in this course **we need to use someone's image tiles\***. Mapbox's business is providing tools and resources, such as these tiles. There are many sources of map tiles, many of which you must register and retrieve a `key` to be able to use. If you exceed certain usage limits you will be cut-off and required to pay to continue. Unless you have a popular site or WebMap you're unlikely to reach the non-free tiers from Mapbox or other services. .ts[\* We could make our own tiles, but that's beyond this course's scope.] ] .pull-right[ Many alternative map [sources](http://openwhatevermap.xyz) exists to Mapbox: .w50[[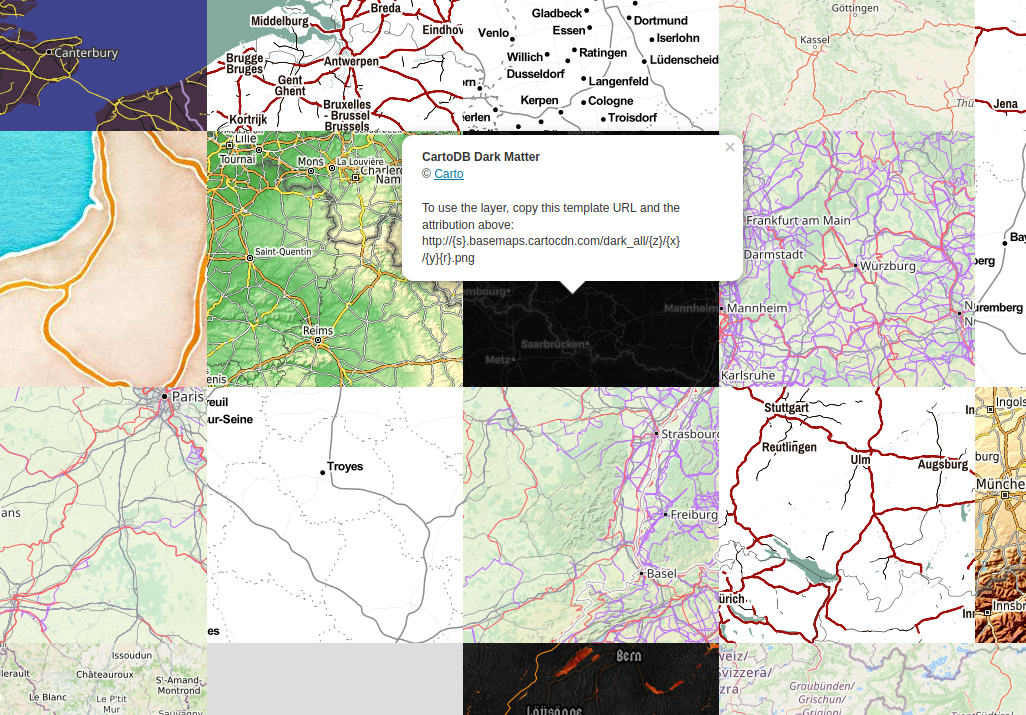](http://openwhatevermap.xyz)] **Either** update your `L.tileLayer` source (and attribution!) to an alternative source **or** register with Mapbox and update the `accessToken`. Some alternative tile layers: .ts[ - http://tile.openstreetmap.org/{z}/{x}/{y}.png - http://{s}.basemaps.cartocdn.com/dark_all/{z}/{x}/{y}{r}.png - http://{s}.basemaps.cartocdn.com/light_all/{z}/{x}/{y}{r}.png - https://stamen-tiles-{s}.a.ssl.fastly.net/watercolor/{z}/{x}/{y}.jpg - https://stamen-tiles-{s}.a.ssl.fastly.net/toner-lite/{z}/{x}/{y}{r}.png - http://tileserver.memomaps.de/tilegen/{z}/{x}/{y}.png ] ] ??? You can now go back to do the activity, you must choose whether to use the Mapbox tiles or another resource. Feel free to ask each other for assistance, or myself. --- class: inverse, center, middle, activity # Activity 3 .pl[ ## Complete the Leaflet creation WebMap exercise Use the instructions and code above and in the resources zip file to help you complete the tasks. While adding following the tutorial you **must think about what you are doing and not just copy code**. ] --- # An alternative WebMap creation method using QGIS .pl[ We will dive straight into another activity. Making a WebMap of certain flight paths of your choice. The process is as follows: 1. Import the data into QGIS 2. Select desired features 3. Change symbology of features 4. Install plugins (qgis2web & QuickMapServices) 5. Create/export WebMap ] .pr[ The data for this exercise is provided in the [zipped resources](rsrcs/l2/lesson2.zip) provided for today. - Again, assure you unzip the data Explore how to do the following activities in QGIS: - Add data (flight_paths_ALL_WGS84) - Open attribute table - Select feature/attributes using an expression - Export selection - Styling a layer's properties - Installing plugins - Adding a base map (QuickMapServices) - Export a WebMap (qgis2web) ] --- class: inverse, center, middle, activity # Activity 4 .pl[ ## Complete your QGIS WebMap Here's a [demonstration](https://youtu.be/snp3lqpvstc) You should replicate the process for an airport of your choice **other than Luxembourg**. ] --- # Upload both WebMaps from today .pl[ **You must keep your individual WebMap files very organized in separate folders.** If your files for this course are a mess things will become much much harder to resolve for you. Beyond just updating these two maps, you must update your main index.html file that we worked on first today, **to point/link to the two new maps**. ] .pr[ 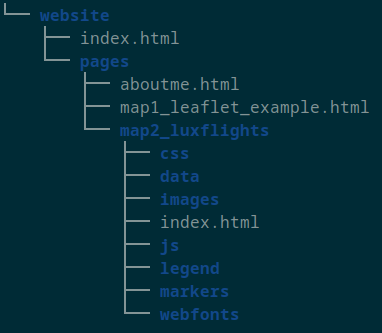 ] --- # Homework .pl[ ## Today's exercises Finish the exercises from today's lecture: 1. Replicating the Leaflet London map 2. Creating a flight paths map of an airport (except Luxembourg) ] .pr[ ## Replication Create new WebMaps: 1. *Using Leaflet* manually create points of interest in Luxembourg - .ts[**Don't share any personal information**] 2. *Using the QGIS plugin* create a WebMap of any theme of your choice. ] .tl[ ## Upload to your server space 1. Upload the **four WebMaps** above to your server space. 2. All maps must be linked from your main index.html file. ] --- # Configuring a Ubuntu 22.10 Server on Digital Ocean .pull-left[.ts[ ### Install and configure Apache2 SSH in as **root**: ```bash apt install apache2 apache2 -version # Configure firewall ufw allow 'Apache' ufw allow 'OpenSSH' ufw status # activate firewall ufw enable ufw status # it should show Apache and OpenSSH enabled # check website in browser # Note we are using http and not https # update the main landing page vim /var/www/html/index.html # use newusers (for usage see: man newusers) to create users from file # use the following format (we leave a few blank): # name:passwd:uid:group:gecos:dir:shell # cyrille:8t3n997zqb::student::/home/cyrille: ``` ]] .pull-right[.ts[ ### Users, pages, and sftp ```bash # generate users from file contents newusers students_list # Enable user directories a2enmod userdir systemctl restart apache2 # make user dirs subdirectories 'visible' to Apache chmod 755 /home/* # Enable sftp for the user group 'students' in # From /etc/ssh/sshd_config comment out Subsystem sftp /usr/libexec/openssh/sftp-server # add Subsystem sftp internal-sftp # and add at the bottom Match Group students # if doesn't work use 'User bob,joe,jim' ChrootDirectory /home X11Forwarding no AllowTcpForwarding no AllowAgentForwarding no ForceCommand internal-sftp PasswordAuthentication yes # then restart the service /etc/init.d/ssh restart ``` ]]